Tudor Doublet and Trunkhose
Part 1 - Planning & Materials
For this project, my goal was to create a set of 16th century garb including trunkhose (aka, pumpkin pants). Beyond that, I didn't have a great deal of inspiration in mind. So the project really began with me going fabric hunting and waiting for something to jump out at me. I knew I wanted something with a pattern or texture that wasn't an obviously modern fabric (so rule out all the modern cotton prints) so I directed my search towards upholstery fabric and eventually found a black fabric with small gold stars in rows that I liked. For the lining I selected a golden linen/rayon blend.
Looking ahead a bit, trunkhosen are a somewhat complicated piece of garb. In particular, there are three layers. The first is an inner pair of shorts not entirely dissimilar from boxer shorts. On top of that is a layer that's significantly larger but with the same overall shape which will be gathered along the edges to create some of the bulk (although additional stuffing will be added between these layers). The outermost layer is several strips of the top fabric which is also lined. This will all be collected into a waistband along the top and a hem along the bottom.
In the gallery here I have not documented the construction of the doublet as the trunkhosen were the more interesting part of the project. If you are interested in the construction of a doublet from the same pattern, I have detailed it with the construction of my slashed doublet.
Part 2 - Drafting and Cutting
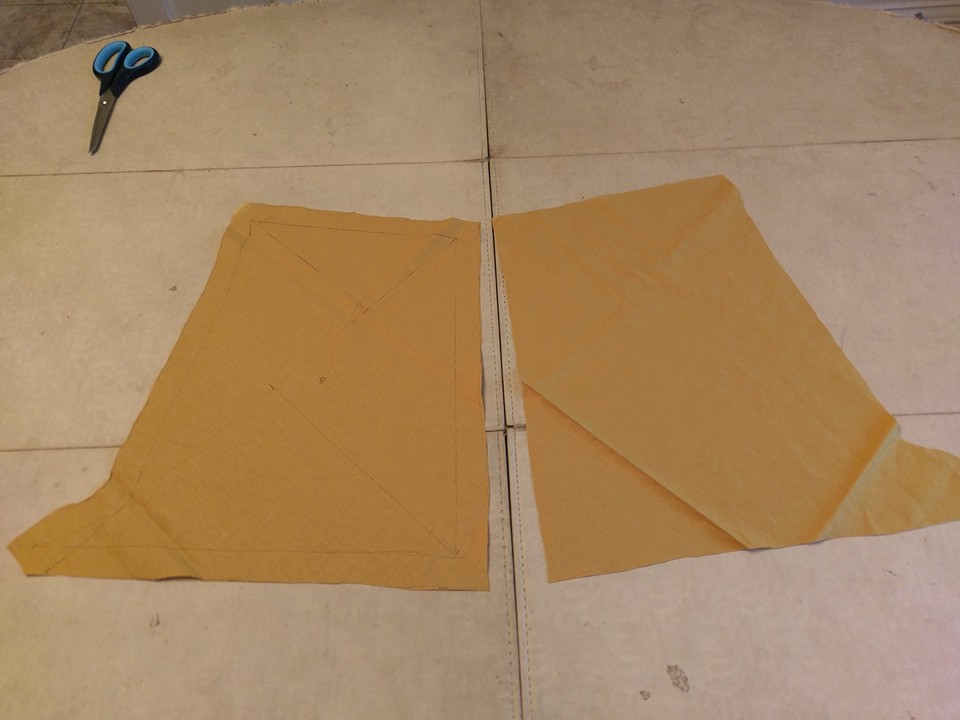 The pattern I used was from The Tudor Tailor. Unfortunately the patterns are not full size so the first step was to transfer the patterns to the fabric. Since many of the pieces were fairly geometrical, I often break the piece into these shapes as can be seen in the image on the left. Once one of these was complete, I could easily fold the fabric to produce the mirror image. The pieces shown here are the inner most layer. The middle layer I discussed above I didn't take a picture of but they are surprisingly large and one of the reasons that producing a pair of these pants takes several yards of fabric (the other being the sheer number of layers).
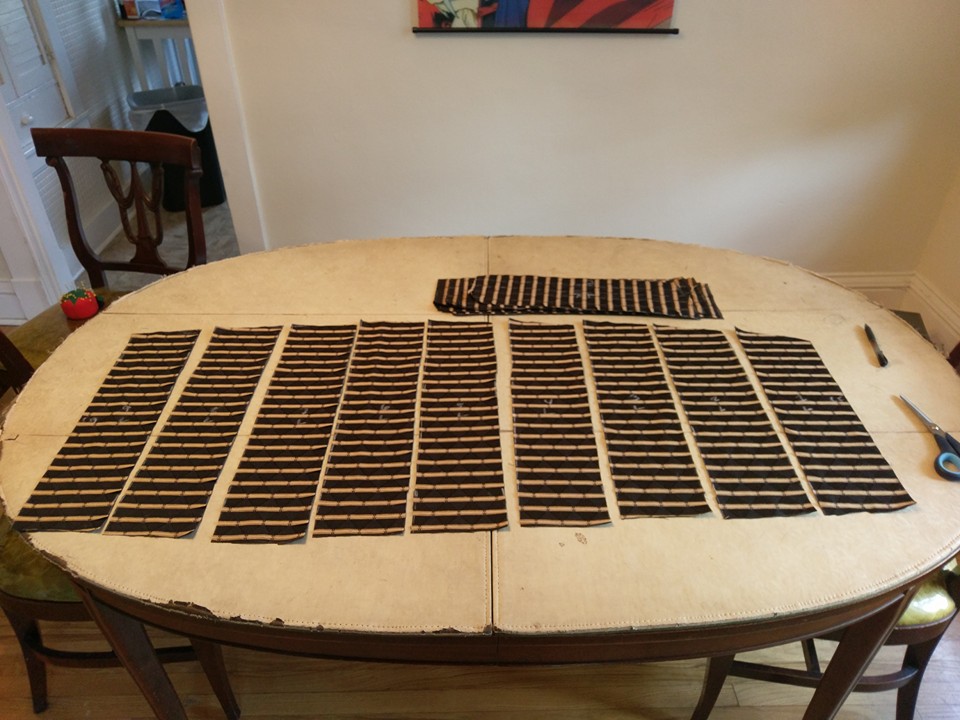 The amount of fabric can also be seen when you consider the outer most layer which is the strips. Shown here is the strips for just one leg laid out and they take up nearly my entire dining room table. If you have a sharp eye you'll notice that the strips aren't entirely even. The reason for this is that the padding that will be inserted later isn't a full doughnut since having that padding between your legs wouldn't be comfortable. Rather, most of the padding should be on the front and sides of the thigh. Again, not too much on the back since that would feel odd to sit in. To ensure I kept all of these panes in order I numbered them prior to cutting.
Part 3 - Construction
 Returning to the lower layers of fabric, I noted previously that the middle layer is significantly oversized to allow it to extend outwards with the stuffing that will be added. This has to be gathered and matched to the inner layer. I'm not a fan of gathering in the more traditional sense as I tend towards pleating since I can determine the number and amount of material that needs to be gathered into each pleat mathematically so can get good results of matching these layers that is evenly collected. As you can see here, it ended up being a fairly large amount of pleating.
 This gives another good illustration of how much extra fabric this middle layer has. Here the middle layer has been attached to the inner layer. The inner one lays flat against the table. Looking at this I can see that I did attempt traditional gathering along the top edge and grimace at the unevenness of it. Keep in mind that this is just one leg shown here. The left and right sides were not sewn at this point because that is where the legs will be connected. In addition, I would later leave a small portion on the back unsewn so the stuffing could easily be removed for washing. Note here again you can see the curvature which will be the outer portion of the leg with the most stuffing.
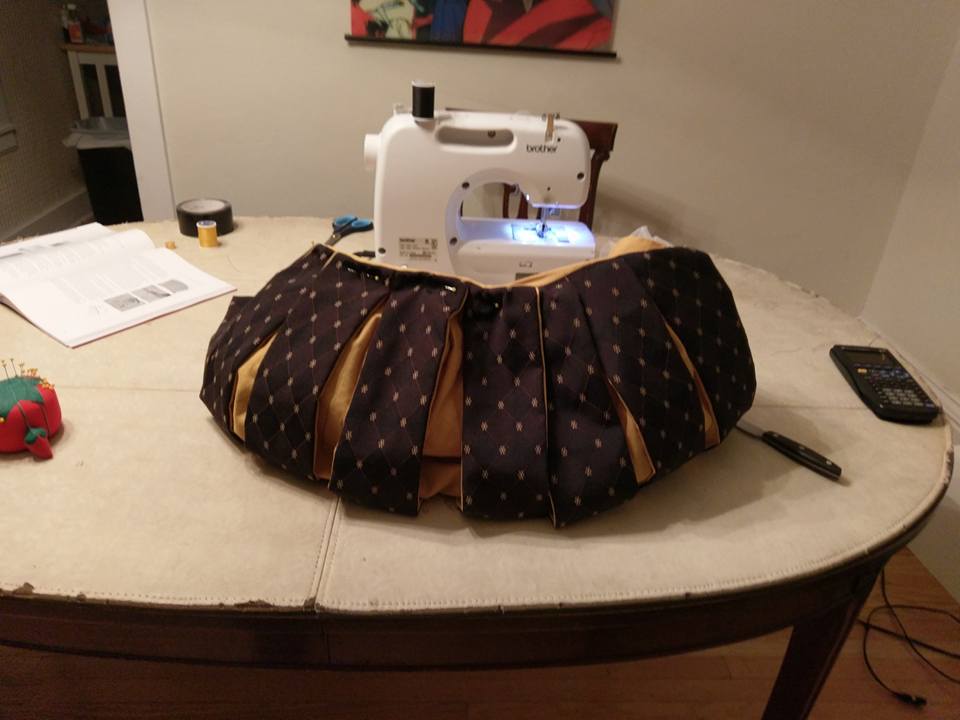 From there, I attached the outer strips (which I had lined). Here I have added some stuffing to start getting an overall idea of the shape. I'm not entirely sure what went wrong here, but the width of the strips did not quite match the width along the waist requiring me to overlap a few slightly.
The legs were joined and a waistband added to cover these raw edges. Initially, I attempted to fit this to my waist, but I quickly found that due to the weight with so much fabric that even a little extra room in the waist, these tend to fall rapidly. I then added points to the doublet and eyelets to the trunkhosen in an attempt to keep them up, but this was insufficient as well. Part of this was that the waistband wasn't solid enough. The points would marginally keep the trunkhosen up at those places, but it would sag elsewhere. Additionally, the cord I used was insufficiently robust. The end result was that I remade the waistband hiding some elastic inside and using hooks for closure at several intervals so the fit could more easily be adjusted.
The period pattern calls for a codpiece but I tend not to be a fan of these aesthetically, so I cheated and used a modern hidden zipper. Similarly, I also used a zipper for the doublet which I hid with a flap. Cloth buttons were added later.
Final Thoughts
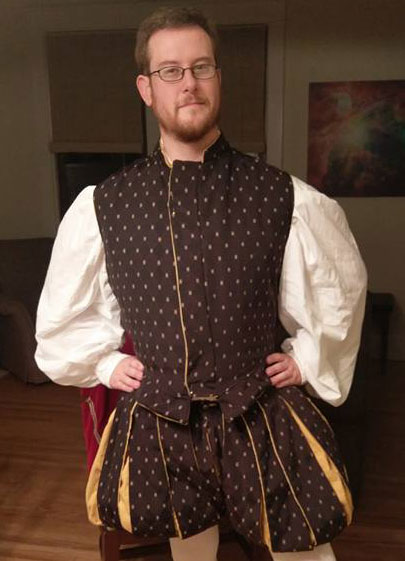 After completing this, I pretty much decided I'd never make another pair of trunkhosen again. The amount of fabric was excessive. The trunkhosen required somewhere around 50 individual pieces. While I'm fairly happy at the final result (especially the fact that these have pockets!) the process was quite laborious. In addition, there are several places where there's several layers of fabric stacked atop one another. The result was several broken needles and cursing.
To complete the set I use a set of XL women's leggings from target since the under hose are challenging to make. For the under shirt I use a "pirate" shirt I picked up from vendors at an event several years ago. In the end, I don't consider this piece entirely complete. The legs aren't quite the same height. Not sure why, but I left a generous seam allowance so if I really want to make the effort I can let some out and correct this but I'm not sure I want to expend the effort.
I'm also not particularly happy with the doublet. The shape doesn't look quite right but I'm not exactly sure why. I think my biggest complaint with it is the aforementioned flap I used to hide the zipper. This wasn't well planned, is overly large, and the top doesn't fit the neckline correctly. The overall look is somewhat odd - Quite wide at the shoulders, a tight waistline and then the giant pants. Perhaps it's modern senibilities, but this just doesn't look good to me. At some point I intend to make poofy half sleeves for the doublet in a similar manner to how the trunkhosen were made, but Tudor Tailor does not have a pattern for this and I haven't distanced myself from the frustration of the trunkhosen enough to want to attempt to draft my own pattern to do so. Perhaps that would help the look though.
I also need to make a matching hat. Hats aren't bad. I should get on that.